爬虫
一、概述
1.1 requests入门
-
安装requests
1
2
3
|
# windows 需要加上 encoding="utf-8", mac是默认的
with open("mybaidu.html", mode="w", encoding="utf-8") as f:
    f.write(resp.read().decode("utf-8"))
|
-
在地址栏中输入搜索的内容,这种方式都是get
若被发现是自动设备发出的请求而被拒绝,可以通过添加agent,如下图中:

1
2
3
4
5
|
# 添加agent 防止被识别为自动化请求
dic = {
    "user-agent": "Mozilla/5.0 (Windows NT 10.0; Win64; x64) AppleWebKit/537.36 (KHTML, like Gecko) Chrome/98.0.4758.102 Safari/537.36"
}
resp = requests.get(url, headers=dic)   # 处理了一个小反爬
|
- 实现翻译功能
寻找下图中的请求:
其请求方式为post方式,从载荷中查看提交的数据,并构造json进行提交:
 1
 2
 3
 4
 5
 6
 7
 8
 9
10
11
12
13
14
15
|
url = "https://fanyi.sogou.com/reventondc/suggV3"

s = input("请输入你要查询的单词:")
dat = {
    "from": "auto",
    "to": "zh-CHS",
    "client": "web",
    "text": s,
    "uuid": "da793e6d-1a41-4448-8df5-ae35fc402c3a",
    "pid": "sogou-dict-vr",
    "addSugg": "on"
}
resp = requests.post(url, json=dat)     # 将服务器返回的内容直接处理成json()  ==> dict格式
dic = resp.json()
print(dic['sugg'])
|
- 爬取豆瓣电影榜单
查看载荷,发现每次新刷新内容,只有start+20,所以可以通过改变请求中的start数据来爬取所有榜单信息。
 1
 2
 3
 4
 5
 6
 7
 8
 9
10
11
12
13
14
15
16
17
18
19
|
url = "https://movie.douban.com/j/chart/top_list"
count = 0
info = []

header = {
    "User-Agent": "Mozilla/5.0 (Windows NT 10.0; Win64; x64) AppleWebKit/537.36 (KHTML, like Gecko) Chrome/98.0.4758.102 Safari/537.36"
}
for count in range(0, 81, 20):
    param = {
        "type": 24,
        'interval_id': "100:90",
        "action": "",
        "start": count,
        "limit": 20
    }
    resp = requests.get(url, params=param, headers=header)
    info.append(resp.json())
    resp.close()  # 关掉resp
print(info)
|
二、数据解析
提供三种解析方式:
- re解析
- bs4解析(使用方便,但解析速度较慢)
- xpath解析
掌握之后,再考虑性能问题。
2.1 Re解析
Re,正则表达式。
语法:使用元字符进行排列组合用来匹配字符串,在线测试正则表达式:https://tool.oschina.net/regex
元字符:具有固定含义的特殊符号
常用元字符:https://cloud.tencent.com/developer/article/1337734
 1
 2
 3
 4
 5
 6
 7
 8
 9
10
11
12
13
14
15
16
17
|
.		匹配除换行符以外的任意字符
\w		匹配字母、数字、下划线
\s		匹配任意的空白符
\d		匹配数字
\n		匹配一个换行符
\t		匹配一个制表符

^		匹配字符串的开始
$		匹配字符串的结尾

\W		匹配非字母、非数字、非下划线
\D		匹配非数字
\S		匹配非空白符
a|b		匹配字符a或字符b
()		匹配括号内的表达式,也表示一个组
[...]	匹配字符组中的字符
[^...]	匹配除了字符组中字符的所有字符
|
量词:控制前面的元字符出现的次数。
1
2
3
4
5
6
|
*		重复零次或更多次
+		重复一次或更多次
?		重复零次或不出现
{n}		重复n次
{n,}	重复n次或更多次
{n,m}	重复n到m次
|
贪婪匹配和惰性匹配
1
2
|
.*		贪婪匹配							 (玩儿吃鸡游戏,玩什么游戏)
.*?		找最短的,?使尽可能少的*,尽可能少的匹配  (玩儿吃鸡游戏)
|
例:
1
2
3
4
|
<div class="jay">周杰伦</div><div class="jj">林俊杰</div>
使用:<.*?".*?">.*?> 或 .*?</div>
结果:<div class="jay">周杰伦</div>
	 <div class="jj">林俊杰</div>
|
我们爬虫用的最多的就是==惰性匹配==
==重点==:
以下几个功能就足够使用:
| finditer |
和findall功能相似(查找所有),但是返回迭代器,效率高 |
| findall |
查找所有,返回list |
| search |
能够进行全文匹配,但检索到第一个就停止并返回 |
| match |
只能从字符串的头部开始匹配 |
预加载正则:
1
|
obj = re.compile(r"正则")
|
从迭代器中拿到内容需要:
提取有用的数据:
 1
 2
 3
 4
 5
 6
 7
 8
 9
10
11
12
13
14
15
16
17
18
19
20
21
22
23
24
25
26
27
28
29
30
31
32
33
34
35
36
37
38
39
40
41
42
43
44
45
46
47
48
49
|
import re


# 最重要*** finditer: 匹配字符串中所有的内容[返回的是迭代器]
it = re.finditer(r"\d+", "我的电话号是:10086, 我女朋友的电话是:10010")
print(it)
# 从迭代器中拿到内容需要 .group()
for i in it:
    print(i.group())

# 预加载正则  可以提高效率
obj = re.compile(r"\d+")  # 可以多次使用
ret = obj.finditer("我的电话号是:10086, 我女朋友的电话是:10010")
for i in ret:
    print(i.group())

# 非常非常重要的点 ********
s = """
<div class='jay'><span id='1'>郭麒麟</span></div>
<div class='jj'><span id='2'>宋铁</span></div>
<div class='jolin'><span id='3'>大聪明</span></div>
<div class='sylar'><span id='4'>范思哲</span></div>
<div class='tory'><span id='5'>胡说八道</span></div>
"""
obj = re.compile(r"<div class='.*?'><span id='\d+'>.*?</span></div>")
ret = obj.finditer(s)
for i in ret:
    print(i.group())
# 提取有用的数据 (?P<group>正则)
obj = re.compile(r"<div class='(?P<class>.*?)'><span id='(?P<id>\d+)'>(?P<name>.*?)</span></div>")
ret = obj.finditer(s)
for i in ret:
    print("class:", i.group("class"), "id:", i.group("id"), "name:", i.group("name"))


# findall: 匹配字符串中所有的符合正则的内容[返回的是数组]  (不经常用 数组效率低)
lst = re.findall(r"\d+", "我的电话号是:10086, 我女朋友的电话是:10010")
print(lst)

# search: 全文进行匹配,找到一个结果就返回,不会全都找到。
# 返回的结果是match对象, 拿数据需要 .group()
s = re.search(r"\d+", "我的电话号是:10086, 我女朋友的电话是:10010")
print(s.group())

# match: 从头开始匹配,
s = re.match(r"\d+", "10086, 我女朋友的电话是:10010")
print(s.group())
|
2.1.1 Re-豆瓣Top250
 1
 2
 3
 4
 5
 6
 7
 8
 9
10
11
12
13
14
15
16
17
18
19
20
21
22
23
24
25
26
27
28
29
30
31
32
33
34
35
36
37
38
39
40
41
42
43
44
45
|
# 拿到页面源代码——requests
# 通过re来提取想要的有效信息——re
import re
import requests
# 存储数据
import csv
num = 0
headers = {
"User-Agent": "Mozilla/5.0 (Windows NT 10.0; Win64; x64) AppleWebKit/537.36 (KHTML, like Gecko) Chrome/98.0.4758.102 Safari/537.36",
"x-client-data": "CJe2yQEIo7bJAQjEtskBCKmdygEInvnLAQjmhMwBCNKPzAEIrZzMAQ==" # # 由于被限制,不被限制就不加 需要更新
}
# 解析数据
obj = re.compile(r'<em class="">(?P<num>.*?)</em>.*?'
r'<div class="info">.*?<span class="title">(?P<name>.*?)</span>.*?'
r'<p class="">.*?<br>(?P<year>.*?) .*?'
r'property="v:average">(?P<rate>.*?)</span>.*?'
r'<span>(?P<people>.*?)</span>.*?', re.S) # re.S 是允许跨行识别
# 如果不使用re.S参数,则只在每一行内进行匹配,如果一行没有,就换下一行重新开始,不会跨行。
# 而使用re.S参数以后,正则表达式会将这个字符串作为一个整体,将“\n”当做一个普通的字符加入到这个字符串中,在整体中进行匹配。
# 生成csv文件 便于数据分析
f = open("data.csv", mode="w", encoding="utf-8")
csv_write = csv.writer(f)
for num in range(10):
# 拿到页面源代码
url = "https://movie.douban.com/top250?start=" + str(num*25)
resp = requests.get(url, headers=headers)
paper_text = resp.text
# print(resp.text)
# 进行匹配
rect = obj.finditer(paper_text)
for i in rect:
dict = i.groupdict()
dict["year"] = dict["year"].strip()
csv_write.writerow(dict.values())
f.close()
print("over!")
# for i in rect:
# print("num:", i.group("num"))
# print("name:", i.group("name"))
# print("year:", i.group("year").strip())
# print("rate:", i.group("rate"))
# print("people:", i.group("people"))
|
2.2 bs4解析
<标签 属性=“属性值”>被标记的内容</标签>
1
2
3
4
5
6
7
8
9
|
<h1 align="center">i love you</h1>
# h1: 标签
# align: 属性
# center: 属性值

<a href="http://www.baidu.com">周杰伦</a>
# a: 标签
# href: 属性
# http: 属性值
|
-
把页面源代码交给BeautifulSoup处理,生成bs对象
1
|
page = BeautifulSoup(resp.text, "html.parser") # 指定html解析器
|
-
从bs对象中查找数据
1
2
|
# find(标签, 属性=值)
# find_all(标签, 属性=值)
|
 1
 2
 3
 4
 5
 6
 7
 8
 9
10
11
12
13
14
15
16
17
18
19
20
21
22
23
24
25
26
27
28
29
|
import time

import requests
from bs4 import BeautifulSoup

url = "https://movie.douban.com/top250"
headers = {
    "User-Agent": "Mozilla/5.0 (Windows NT 10.0; Win64; x64) AppleWebKit/537.36 (KHTML, like Gecko) Chrome/98.0.4758.102 Safari/537.36",
    "x-client-data": "CJe2yQEIo7bJAQjEtskBCKmdygEInvnLAQjmhMwBCNKPzAEIrZzMAQ=="  # # 由于被限制,不被限制就不加 需要更新
}
resp = requests.get(url, headers=headers)
# print(resp.text)
page_text = BeautifulSoup(resp.text, "html.parser")
pic_list = page_text.find_all("div", class_="pic")

for i in pic_list:
    img_list = i.find_all("img")
    for img in img_list:
        # print(img)
        name = img.get("alt")   # 拿到名字
        src = img.get("src")    # 直接通过get就可以拿到属性的值, 刚好是子页面的下载路径
        # 下载图片
        img_resp = requests.get(src)
        img_byte = img_resp.content    # 这里拿到的是字节
        img_name = name + ".jpg"
        with open("img/" + img_name, mode="wb") as f:   # 对文件夹mark directory as exclude   可以避免pycharm一直对文件进行索引
            f.write(img_byte)
        print("over!!", img_name)
        time.sleep(1)
|
2.3 Xpath解析
xpath是在xml文档中搜索内容的一门语言,html是xml的一个子集。
安装lxml模块:
1
2
|
conda install lxml
from lxml import etree
|
可以把各级标签模拟为各级目录
- 使用 / 表示层级关系,第一个/表示根节点
- 使用 // 取出所有的后代
- /*/ *表示通配符 任意的节点
- /text() 取出其中的文本内容
- xpath下标从1开始 [1]
读取html文件:
1
|
etree.parse("xxx.html")
|
筛选属性:
1
2
3
4
|
.xpath("/html/body/ul/li[1]/a/text()")   # 可以拿出第一个li标签中a标签的文本

.xpath("/html/body/ul/li/a[@href='dapao']/text()")	# 可以拿出a标签中属性href=dapao的文本
.xpath("/html/body/ul/li/a/@href")		# 拿出标签a的所有href属性
|
返回列表:
1
2
3
4
5
|
ol_li_list = tree.xpath("/html/body/ol/li")	# 返回li标签列表
for li in ol_li_list:
    # 使用 .表示相对路径   相当于li其实
    result = li.xpath("./a/text()")	# 取li中a标签的文本,相对查找
    result = li.xpath("./a/@href")	# 拿到属性值: @属性
|
 1
 2
 3
 4
 5
 6
 7
 8
 9
10
11
12
13
14
15
16
17
18
|
# 拿到页面源代码
# 提取和解析数据

import requests
from lxml import etree
url = "https://nanjing.zbj.com/search/f/?kw=saas"
resp = requests.get(url)
# print(resp.text)
# 解析
html = etree.HTML(resp.text)

div_list = html.xpath("/html/body/div[6]/div/div/div[2]/div[5]/div[1]/div")     # 拿到每一个服务商的div标签
for div in div_list:
    price = div.xpath("./div/div/a[2]/div[2]/div[1]/span[1]/text()")[0].strip("¥")  # price: ['¥898']  使用strip()处理数据
    title = "SaaS".join(div.xpath("./div/div/a[2]/div[2]/div[2]/p/text()"))     # ['软件开发/OA/软件定制开发/', '软件/原生混合/物联网'] 中间应该是有SasS的 但是没有提取出来  因此用join进行拼接
    company = div.xpath("./div/div/a[1]/div[1]/p/text()")[1].strip()                      # company: ['\n\n', '\n\n彬达科技']  使用strip()可以直接去掉\n
    location = div.xpath("./div/div/a[1]/div[1]/div/span/text()")[0]
    print("title:", title, "price:", price, "company:", company, "location:", location)
|
三、request进阶
3.1 模拟登录-cookie
发现访问该网站可以得到cookie,注意:cookie一般不会在 预览 中, 一般在 响应标头 中
因此可以POST该网站得到cookie
 1
 2
 3
 4
 5
 6
 7
 8
 9
10
11
12
13
|
    # 获得cookie,构造headers
    def get_cookie(self):
        cookie_url = "http://ehall.seu.edu.cn/ygfw/sys/swpubapp/xxx"
        cookie_response = self.session.post(cookie_url, data={"USERID": self.user_info.user_id})
		# 将cookies转化为字典格式
        print(cookie_response.cookies.get_dict())

$ python main.py
得到Cookie
{
	NSC_ESNS=57d88235-1b4a-127e-9678-00e0ed9d66bd_2375465377_1978659927_00000000005768517823; 				NSC_JOqgyvhaegq01uld2umxhgbeip03kb0=ffffffff09489f1745525d5f4f58455e445a4a423660; _WEU=tbZT
	ZDIpO9DfzKWosRmHWCxuajrVVDsuty8Dy6k2GDK0hXp7irsDDNISCgMQIZQTK*DeyDKn7eS0h2lzXOQEjo..;
}
|
但此时的Cookie不够,还缺少
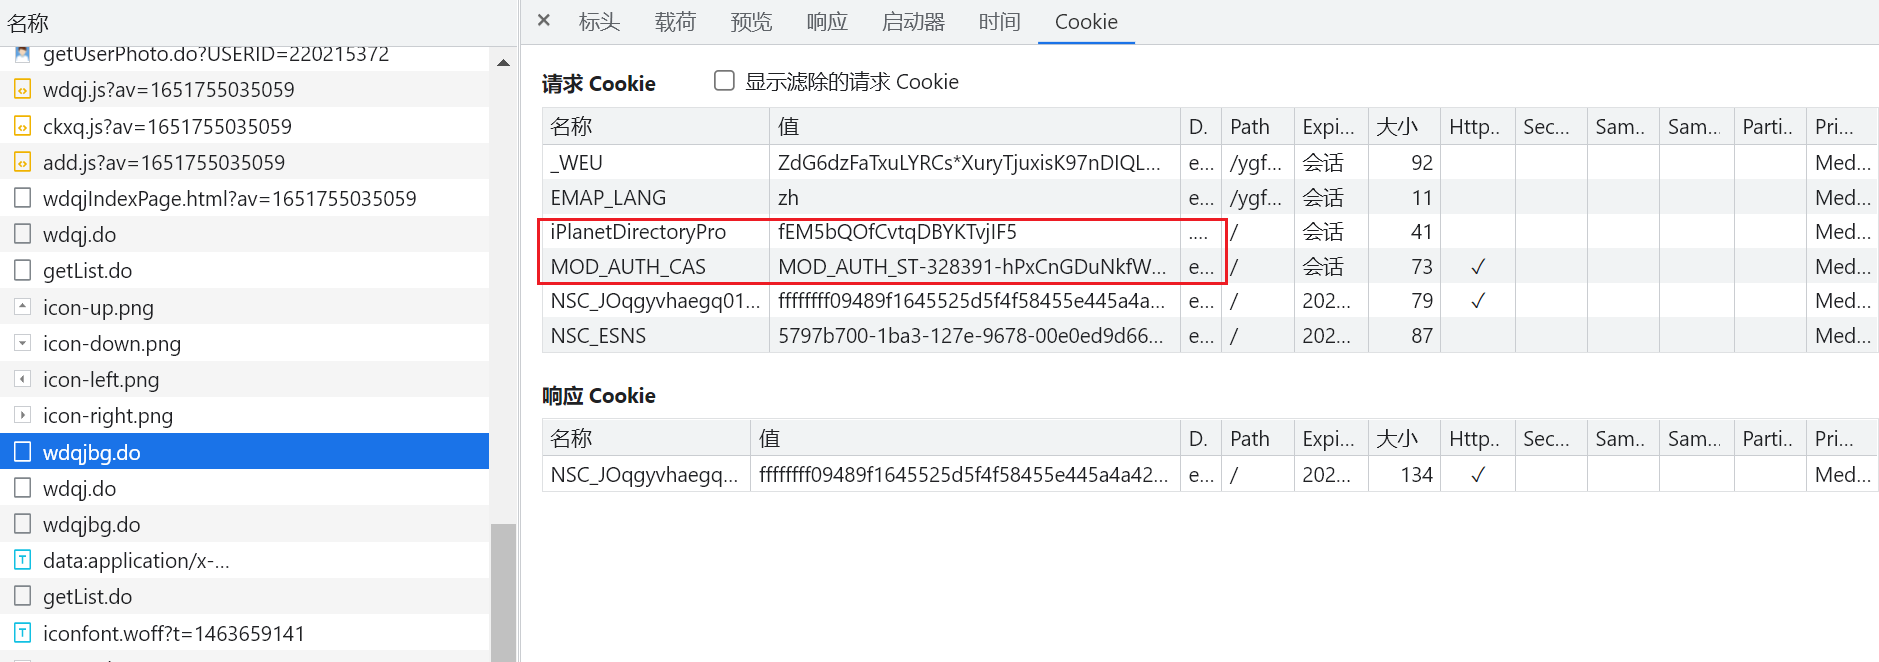
当重新登录并抓包,可以发现红色框中的Cookie在首次登陆时获得:
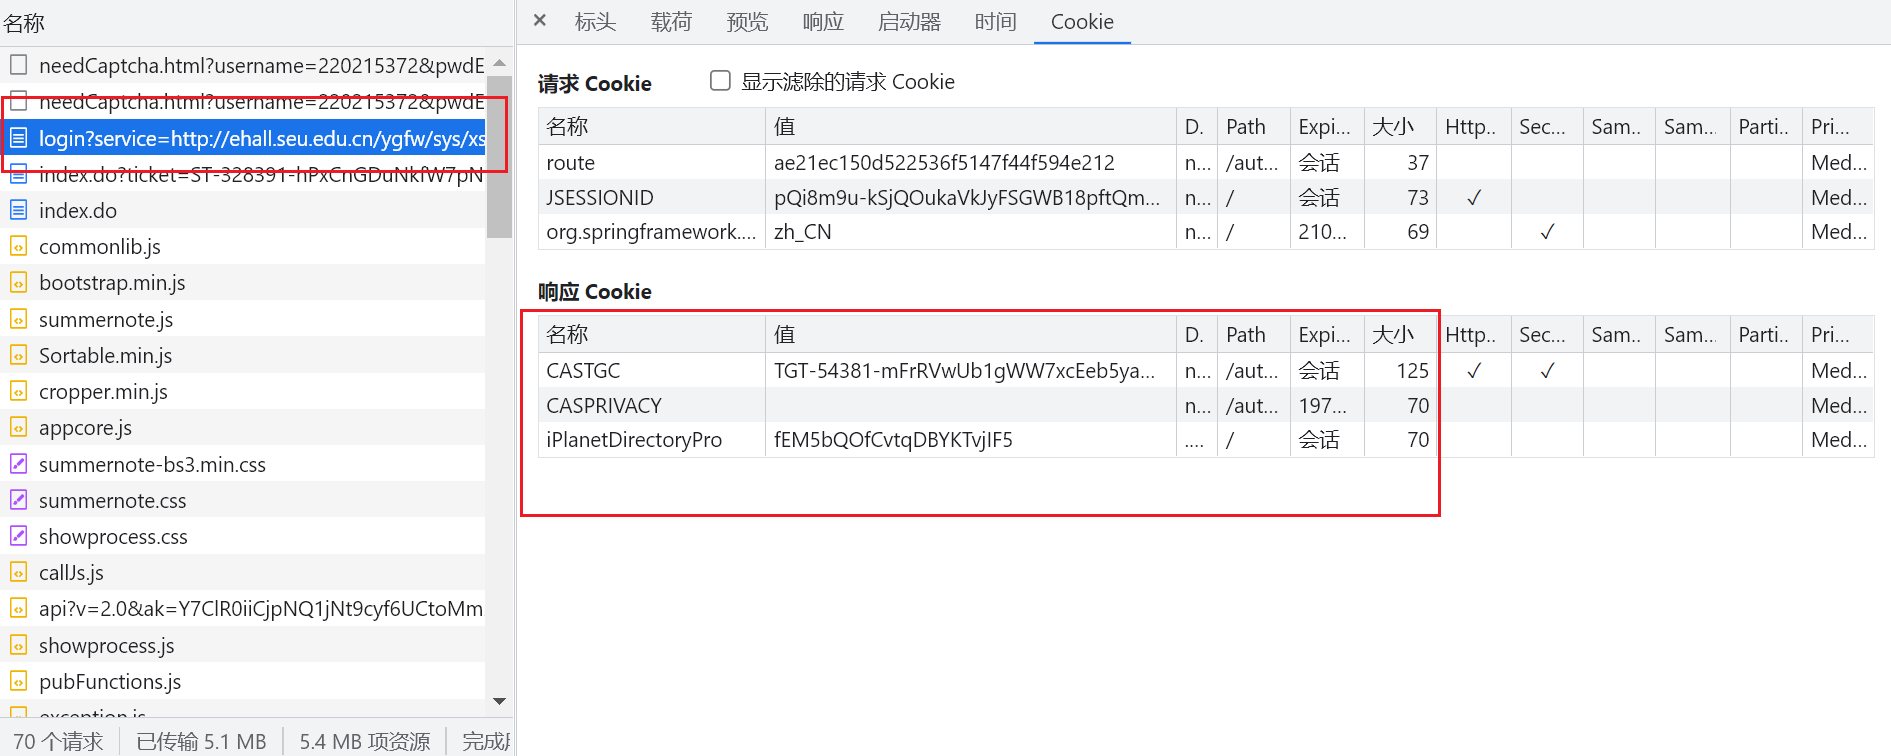
因此在login的时候,就应该保存该Cookie。
提交表单需要编码:
1
2
3
|
self.header['Content-Type'] = 'application/x-www-form-urlencoded; charset=UTF-8'
data = parse.urlencode(post_info)
   self.session.post(url=url, data=data, headers=self.header)
|
3.2 防盗链
Referer: “” 用于验证你的资源链接是从哪来的? 相当于溯源
从梨视频网站下载视频 流程:
- 拿到请求网址和contID
- 拿到videoStatus返回的.json –> srcUrl
- 修正srcUrl
- 下载视频
 1
 2
 3
 4
 5
 6
 7
 8
 9
10
11
12
13
14
15
16
17
18
19
20
21
22
23
24
25
26
27
28
29
30
31
32
33
|
# 1. 拿到contID
# 2. 拿到videoStatus返回的.json --> srcUrl
# 3. 修正srcUrl
# 4. 下载视频

import requests

# 拉取视频资源网站
url = "https://www.pearvideo.com/video_1752547"
url_cont = url.split("_")[1]    # 以 _ 分割为两个元素,取第二个
video_url = f"https://www.pearvideo.com/videoStatus.jsp?contId={url_cont}"
headers = {
    "User-Agent": "Mozilla/5.0 (Windows NT 10.0; Win64; x64) AppleWebKit/537.36 (KHTML, like Gecko) Chrome/98.0.4758.102 Safari/537.36",
    "Referer": url
    }
# 拿到响应包
resp = requests.get(video_url, headers=headers)
# 从网络响应包中找到网络资源地址:
# https://video.pearvideo.com/mp4/adshort/20220222/1646013336252-15830346_adpkg-ad_hd.mp4
# 从https://www.pearvideo.com/video_1658861的页面元素中找到视频地址为:
# https://video.pearvideo.com/mp4/adshort/20220222/cont-1752547-15830346_adpkg-ad_hd.mp4

dic = resp.json()
srcUrl = dic['videoInfo']['videos']['srcUrl']  # 拿到的网址并不能直接使用,通过以上的对比进行修改
sysTime = dic['systemTime']
# 修改srcUrl
srcUrl = srcUrl.replace(sysTime, f"cont-{url_cont}")
print(srcUrl)
# 请求video资源
video = requests.get(srcUrl)
with open("a.mp4", mode="wb") as f:
    f.write(video.content)
print("Over!!")
|
通过对比,发现只有 cont-1658861 不一样,并且cont后面的数字和原链接最后的数字相同,因此对响应包中的资源url进行修正。
3.3 代理
原理:
通过第三方的机器去发送请求
3.4 网易云评论
里边用到加密算法,需要安装:
1
2
|
conda install pycrypto
from Crypto.Cipher import AES
|
考虑过程为:
- 找到未加密的参数
- 想办法对参数进行加密(按照网易的加密方法),params和encSecKey
- 请求到网易,拿到评论信息
找到评论所在请求:
找到请求评论的链接:
因为请求方法是Post,发现表单数据被加密:
查看程序调用堆栈。选取最上面那个。因为他是最后执行的,也就是发送数据的:
完事进去之后发现程序停留在这一行,刚好是send,在这一行设置程序断点:
查看当前请求的url,发现和我们想要的评论url不同:
继续执行,直到我们想要的url为止,此时data里的param被加密:
需要往回找未加密的,通过 调用堆栈 往上找:
打开之后发现依然是加密的:
那么需要再往上找,直到找到未加密的参数,也就是说在下一层t0x.be0x中数据才被加密:
那么回到上一层中,找到集体在何处被加密:
在函数中逐行设置断点,慢慢检测在何处数据被加密:
使用图中按钮可以逐行检测代码结果,在window…这一行还是明文:
到了下一行,参数被加密,因此可以断定加密函数是window…,并可以得到原文:
可以看出,params ==> encText,encSecKey ==> encSecKey:
取加密函数:
注意原函数里面的参数,需要给他配齐,对应着调用处的实参,可以对其进行赋值:
通过在控制台运行,可以得到其他参数:
或者通过以下方式也可以得到参数:
设置断点拿到以下参数:
  1
  2
  3
  4
  5
  6
  7
  8
  9
 10
 11
 12
 13
 14
 15
 16
 17
 18
 19
 20
 21
 22
 23
 24
 25
 26
 27
 28
 29
 30
 31
 32
 33
 34
 35
 36
 37
 38
 39
 40
 41
 42
 43
 44
 45
 46
 47
 48
 49
 50
 51
 52
 53
 54
 55
 56
 57
 58
 59
 60
 61
 62
 63
 64
 65
 66
 67
 68
 69
 70
 71
 72
 73
 74
 75
 76
 77
 78
 79
 80
 81
 82
 83
 84
 85
 86
 87
 88
 89
 90
 91
 92
 93
 94
 95
 96
 97
 98
 99
100
101
102
103
104
105
106
107
108
109
110
111
112
113
114
115
116
117
118
119
120
121
122
123
124
125
126
127
128
129
130
131
132
133
134
|
# 找到未加密的参数
# 想办法把参数进行加密(必须参考网易的逻辑),params,encSecKey
# 请求到网易 拿到评论信息
import requests
from Crypto.Cipher import AES
from base64 import b64encode
import json


url = "https://music.163.com/weapi/comment/resource/comments/get?csrf_token="
# 请求方法是POST
# 找到真实参数


e = '010001'
f = '00e0b509f6259df8642dbc35662901477df22677ec152b5ff68ace615bb7b725152b3ab17a876aea8a5aa76d2e417629ec4ee341' \
    'f56135fccf695280104e0312ecbda92557c93870114af6c9d05c4f7f0c3685b7a46bee255932575cce10b424d813cfe4875d3e82' \
    '047b97ddef52741d546b8e289dc6935b3ece0462db0a22b8e7'
g = '0CoJUm6Qyw8W8jud'
# i是个随机值,因此我们只能去响应包中拿取i
i = '9bdHkFpLbUCNTAnl'
# 为了简化运算(不想处理c函数),设置为固定的   i固定 则它也固定
def get_encSecKey():
    return "1eb5a1efb12baafd580884b5c41b0a5bbbaee1c0de49f9d0470f05aa2a9215c25563b0ad5da008dacd85f65e0406addbd" \
           "a43bbe77716896089f607826000aa4797f34e03e8eb822096c166ec8ae4463ec1f7dab60c045eff18dfdef9f78555301f" \
           "3107d521918fea66940b6589749b9db575afa03f74ec04d01f1726f22ba1d2"


def get_params(data):
    # 此处的data需要是字符串格式,不能是字典格式,因此需要使用json转换
    first = enc_params(data, g)
    params = enc_params(first, i)
    return params


def enc_params(data, key):   # 加密过程
    iv = "0102030405060708"
    aes = AES.new(key=key.encode("utf-8"), IV=iv.encode("utf-8"), mode=AES.MODE_CBC)     # 创建一个AES对象
    bs = aes.encrypt(to_16(data))   # 加密,加密内容必须是16的倍数
    # 由于加密结果是不能直接转为字符串的,需要先转化为base64才行,然后再转化为字符串
    return str(b64encode(bs), "utf-8")


def to_16(data):
    pam = 16 - len(data) % 16
    data += chr(pam) * pam
    return data


# 进行加密过程
"""
    function a(a = 16) {    # 随机产生16位随机码
        var d, e, b = "abcdefghijklmnopqrstuvwxyzABCDEFGHIJKLMNOPQRSTUVWXYZ0123456789", c = "";
        for (d = 0; a > d; d += 1)  # 随机16次
            e = Math.random() * b.length,   # 随机数
            e = Math.floor(e),     # 取整
            c += b.charAt(e);     # 去字符串中的xxx位置 b
        return c
    }
    function b(a, b) {
        var c = CryptoJS.enc.Utf8.parse(b)
          , d = CryptoJS.enc.Utf8.parse("0102030405060708")
          , e = CryptoJS.enc.Utf8.parse(a)
          , f = CryptoJS.AES.encrypt(e, c, {    # AES算法 e原文,c是密钥
            iv: d,      # 偏移量
            mode: CryptoJS.mode.CBC     # 模式:CBC
        });
        return f.toString()
    }
    function c(a, b, c) {
        var d, e;
        return setMaxDigits(131),
        d = new RSAKeyPair(b,"",c),
        e = encryptedString(d, a)
    }
    function d(d, e, f, g) {  # d:data, e:'010001', f:很长, g:'0CoJUm6Qyw8W8jud'
        var h = {}   # 设置一个空对象
          , i = a(16);  # i就是一个随机值
        return h.encText = b(d, g),  # g 当作密钥
        h.encText = b(h.encText, i),  # 返回的就是params
        h.encSecKey = c(i, e, f),     # 返回的就是encSecKey   其中e、f都是定死的,只有i是变量,若固定i,则得到的key一定是固定的
        h
    }
    function e(a, b, d, e) {
        var f = {};
        return f.encText = c(a + e, b, d),
        f
    }
"""


def get_comments(url, song_id, page_num):
    rid = "R_SO_4_" + song_id
    threadId = "R_SO_4_" + song_id
    data = {
        "cursor": "-1",  # 这个和paperNo共同决定哪一页的评论1610629253639  1621187632097
        "offset": page_num * 20 % 200,  # 代表最新评论的页数
        "orderType": "1",
        "pageNo": page_num + 1,  # 代表热评的页数
        "pageSize": "20",
        "rid": rid,
        "threadId": threadId,
    }

    resp = requests.post(url, data={
        "params": get_params(json.dumps(data)),
        "encSecKey": get_encSecKey()
    })
    source = resp.json()["data"]
    # print(source)

    if source["hotComments"] != None and page_num == 0:
        print("=====hotComments=====")
        for hot_comment in source["hotComments"]:
            print(hot_comment["user"]["nickname"], ":", hot_comment["content"], "\ntime:", hot_comment["timeStr"], "点赞数:", hot_comment["likedCount"])
            print("-"*10)
    elif source["comments"] != None:
        print("=====latestComments=====")
        for latest_comment in source["comments"]:
            print(latest_comment["user"]["nickname"], ":", latest_comment["content"], "\ntime:", latest_comment["timeStr"])
            print("-"*10)
    else:
        return "nil"
# for num in range(1, 34):
#     get_comments(url, num)


if __name__ == '__main__':
    song_id = "1923184888"
    for page_num in range(0, 100):
        print(f"*****第{page_num+1}页*****")
        if get_comments(url, song_id, page_num) == "nil":
            break
    print("over!!!")
|
四、加速
进程是一个资源单位,线程是一个执行单位
eg: xxx进程包含多个线程;一个项目组(进程)包含多个工作人员(线程);
4.1 多线程
 1
 2
 3
 4
 5
 6
 7
 8
 9
10
11
12
13
14
15
16
17
18
19
20
21
22
23
24
25
26
27
28
29
30
31
32
33
34
35
36
37
38
39
|
# 多线程

from threading import Thread


class MyThread(Thread):
    def run(self):  # 固定的,  -> 当线程被执行的时候,被执行的就是run()
        for i in range(1000):
            print("子线程: ", i)


if __name__ == "__main__":
    t = MyThread()
    # t.run()  # 这种方法是调用方法,依然是单线程
    t.start()  # 开启线程,线程此时可以开始工作,但不必须,具体执行时间由CPU决定
    for i in range(1000):
        print("主线程:", i)


# =========重命名=========
class MyThread(Thread):
    def __init__(self, name):
        Thread.__init__(self, name=name)
    def run(self):  # 固定的,  -> 当线程被执行的时候,被执行的就是run()
        for i in range(1000):
            print(self.getName(), i)
            time.sleep(1)


if __name__ == "__main__":
    t1 = MyThread("wlh")
    # t.run()  # 这种方法是调用方法,依然是单线程
    t1.start()  # 开启线程,线程此时可以开始工作,但不必须,具体执行时间由CPU决定
    t2 = MyThread("zjl")
    # t.run()  # 这种方法是调用方法,依然是单线程
    t2.start()  # 开启线程,线程此时可以开始工作,但不必须,具体执行时间由CPU决定
    #
    # for i in range(1000):
    #     print("主线程:", i)
|
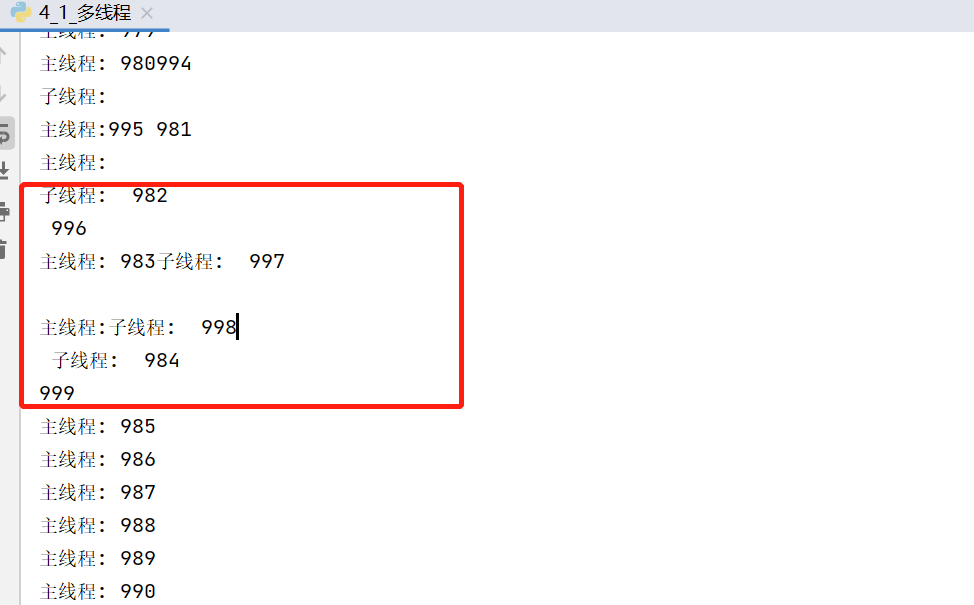
由于主线程和子线程同时执行,共同输出在工作台,所以会造成图中的情况:
4.2 多进程
 1
 2
 3
 4
 5
 6
 7
 8
 9
10
11
12
13
14
15
16
|
import time
from multiprocessing import Process


def func():
    for i in range(1000):
        print("子进程:", i)
        time.sleep(1)


if __name__ == '__main__':
    p = Process(target=func)
    p.start()
    for i in range(1000):
        print("主进程:", i)
        time.sleep(1)
|
4.3 线程池\进程池
线程池:一次性开辟一些线程,用户直接给线程池提交任务,线程的任务调度交给线程池完成
创建线程池:
1
2
3
4
|
from concurrent.futures import ThreadPoolExecutor
with ThreadPoolExecutor(num) as t:
    t.submit()
# 线程池外的叫做守护,需要等待线程池内的任务执行完毕,才能继续执行
|
- 如何提取单个页面 的数据
- 利用线程池,进行多个页面同时抓取
北京新发地举例:
 1
 2
 3
 4
 5
 6
 7
 8
 9
10
11
12
13
14
15
16
17
18
19
20
21
22
23
24
25
26
27
28
29
30
31
32
33
34
35
36
37
38
39
40
41
42
43
44
45
|
import requests
import csv
from concurrent.futures import ThreadPoolExecutor

f = open("xfd_list.csv", mode="w", encoding="utf-8", newline='')  # newline 是为了过滤掉换行符
csv_writer = csv.writer(f)


def download_one_page(url, page_num):
    data = {
        "current": page_num
    }
    html_page_json = requests.post(url, data=data).json()
    price_list = html_page_json['list']

    for item in price_list:
        # print(item)
        # txt = [0 for _ in range(7)]
        txt = [None] * 7
        txt[0] = item['prodName']
        txt[1] = item['lowPrice']
        txt[2] = item['highPrice']
        txt[3] = item['avgPrice']
        txt[4] = item['place']
        txt[5] = item['unitInfo']
        txt[6] = item['pubDate']
        # txt.append(item['prodName'])
        # txt.append(item['lowPrice'])
        # txt.append(item['highPrice'])
        # txt.append(item['avgPrice'])
        # txt.append(item['place'])
        # txt.append(item['unitInfo'])
        # txt.append(item['pubDate'])
    # print(info)
        csv_writer.writerow(txt)
    print(page_num, "提取完毕!!!")


if __name__ == '__main__':
    with ThreadPoolExecutor(30) as f: 		# 开多了有可能出格式问题
        for num in range(1, 200):
            f.submit(download_one_page, "http://www.xinfadi.com.cn/getPriceData.html", num)
    print("全部下载完毕!!!")
    # for num in range(1, 200):
    #     download_one_page("http://www.xinfadi.com.cn/getPriceData.html", num)
|
4.4 协程
要达到异步效果,需要将同步操作写为协程操作:
(同步操作)
(异步操作)
python不太希望上述写法,因为主进程里线程过多,建议下述写法:
 1
 2
 3
 4
 5
 6
 7
 8
 9
10
11
12
13
14
15
16
17
18
19
20
21
22
23
24
25
26
27
28
29
30
31
32
33
34
35
36
37
38
39
|
# python不希望上面那种写法,因为主进程的线程过多

async def func1():
    print("你好!我是李雪琴!")
    await asyncio.sleep(3)     # 将异步操作挂起
    print("你好!我是李雪琴!")


async def func2():
    print("你好!我是王建国!")
    await asyncio.sleep(2)     # 将异步操作挂起
    print("你好!我是王建国!")


async def func3():
    print("你好!我是黎明!")
    await asyncio.sleep(4)     # 将异步操作挂起
    print("你好!我是黎明!")


async def main():
    # 第一种写法
    # f1 = func1()
    # await f1  # 一般wait挂起操作放在协程对象前面

    # 第二种写法(推荐)
    # 一次性启动多个任务(协程)
    tasks = {
        asyncio.create_task(func1()),   # 创建成task对象
        asyncio.create_task(func2()),
        asyncio.create_task(func3())
    }
    await asyncio.wait(tasks)   # 挂起

if __name__ == '__main__':
    t1 = time.time()
    asyncio.run(main())
    t2 = time.time()
    print(t2 - t1)
|
模拟爬虫应用:
 1
 2
 3
 4
 5
 6
 7
 8
 9
10
11
12
13
14
15
16
17
18
19
20
21
22
|
# 模拟爬虫应用
async def download(url):
    print(url, "准备开始下载")
    await asyncio.sleep(2)    # 模拟网络请求  实际中 只需在此处将爬虫网络请求语句写为协程形式即可
    print(url, "下载完毕")


async def main(urls):
    tasks = []
    for url in urls:
        tasks.append(download(url))
    # tasks = [asyncio.create_task(download(url)) for url in urls]   # 这样也可以 效果一样的 更加简洁
    await asyncio.wait(tasks)


if __name__ == '__main__':
    urls = {
        "https://www.google.com/webhp",
        "https://www.baidu.com/",
        "https://www.bilibili.com/"
    }
    asyncio.run(main(urls))
|
4.5 aiohttp模块应用
requests.get() 同步的代码 —> 异步操作aiohttp
 1
 2
 3
 4
 5
 6
 7
 8
 9
10
11
12
13
14
15
16
17
18
19
20
21
22
23
24
25
26
27
|
conda install aiohttp
import aiohttp
# aiohttp.ClientSession()  <==>  requests  几乎一模一样

async def download(url):
    name = url.rsplit('/', 1)[1]                     # 从右边切片,切一次,取第二个元素
    async with aiohttp.ClientSession() as Session:   # Session现在相当于requests
        async with Session.get(url) as resp:         # resp = requests.get(url)
            with open(name, mode='wb') as f:         # 当请求返回,就可以开始写入文件 此处可以延申 aiofiles 异步写入文件
                f.write(await resp.content.read())   # 读取内容是异步的,因此需要await挂起
    print(name, "下载完毕!")


async def main(urls):
    tasks = [asyncio.create_task(download(url)) for url in urls]
    await asyncio.wait(tasks)


if __name__ == '__main__':
    urls = {
        "https://img.syt5.com/2021/0907/20210907082121262.jpg",
        "https://img.syt5.com/2021/0907/20210907082121629.jpg",
        "https://img.syt5.com/2021/0907/20210907082121801.jpg"
    }
    # asyncio.run(main(urls))   # 会报错,RuntimeError: Event loop is closed   改为如下:
    loop = asyncio.get_event_loop()
    loop.run_until_complete(main(urls))
|
4.6 抓取小说
 1
 2
 3
 4
 5
 6
 7
 8
 9
10
11
12
13
14
15
16
17
18
19
20
21
22
23
24
25
26
27
28
29
30
31
32
33
34
35
36
37
38
39
40
41
42
43
44
45
46
47
48
|
import requests
import asyncio
import aiohttp
import aiofiles
import json

# 所需网址
# http://dushu.baidu.com/api/pc/getCatalog?data={"book_id":"4306063500"}  # 小说章节
# http://dushu.baidu.com/api/pc/getChapterContent?data={"book_id":"4306063500","cid":"4306063500|1569782244","need_bookinfo":1}  # 小说章节内容


async def get_catalog(url):
    resp = requests.get(url)
    dict = resp.json()
    book_id = dict['data']['novel']['book_id']
    tasks = []
    for item in dict['data']['novel']['items']:
        title = item['title']
        cid = item['cid']
        # 此处可以开始进行获取小说内容
        # 准备异步任务
        tasks.append(get_content(book_id, title, cid))
    # 开始执行异步任务
    await asyncio.wait(tasks)
    print("下载完毕!!!")


async def get_content(book_id, title, cid):
    data = {
        "book_id": book_id,
        "cid": f"{book_id}|{cid}",
        "need_bookinfo": 1
    }
    data = json.dumps(data)
    url = f'http://dushu.baidu.com/api/pc/getChapterContent?data={data}'
    async with aiohttp.ClientSession() as session:
        async with session.get(url) as resp:
            dict = await resp.json()
            # 异步写入 aiofiles
            async with aiofiles.open('西游记/' + title + '.txt', mode='w', encoding='utf-8') as f:
                await f.write(dict['data']['novel']['content'])


if __name__ == '__main__':
    book_id = '4306063500'
    url = 'http://dushu.baidu.com/api/pc/getCatalog?data={"book_id":"' + book_id + '"}'
    # print(url)
    asyncio.run(get_catalog(url))
|
新建文档:
4.7 视频抓取
首先,视频不可能直接加载到页面,因为这样会导致网页速度极慢……不可能一次性加载完毕!!!
那视频网站一般怎么做呢???
答:用户上传 –> 转码(把视频做处理,2k,1080,标清) –> 切片处理(把单个的文件进行拆分)
需要一个文件记录:1. 视频播放顺序,2. 视频存放路径。 M3U8 txt json ==> 文本
想要抓取一个视频:
- 找到m3u8文件(各种手段)
- 通过m3u8下载到ts文件
- 可以通过各种手段(不仅是编程手段) 把ts文件合并为一个mp4文件
4.7.1 简单难度
流程:
- 针对页面源代码中含有m3u8的视频,采用以下方法抓取到m3u8文件:
 1
 2
 3
 4
 5
 6
 7
 8
 9
10
11
12
13
14
15
16
17
18
19
20
21
22
23
24
25
26
27
|
if __name__ == '__main__':
    url = 'https://91kju.com/vod-play-id-1039-sid-1-pid-1.html'
    headers = {
        "user-agent": "Mozilla/5.0 (Windows NT 10.0; Win64; x64) AppleWebKit/537.36 (KHTML, like Gecko) Chrome/98.0.4758.102 Safari/537.36",
        "origin": "https://91kju.com"
    }
    resp = requests.get(url, headers=headers)
    # obj = re.compile(r"\"url\":(?P<url>.*?),", re.S)          # 注意!!!这样提取出来的网址是带引号的!必然是无法访问的,要提取不带引号的网址!!!
    obj = re.compile(r"\"url\":\"(?P<url>.*?)\",", re.S)        # 此处一定要注意!!!
    # print(resp.text)
    m3u8_url = obj.search(resp.text).group('url').replace('\\', '')
    # print(m3u8_url)
    # 下载m3u8文件
    path = m3u8_url.rsplit('/', 1)[1]
    resp.close()
    headers = {
        "user-agent": "Mozilla/5.0 (Windows NT 10.0; Win64; x64) AppleWebKit/537.36 (KHTML, like Gecko) Chrome/98.0.4758.102 Safari/537.36",
        "origin": "https://91kju.com",
        "path": f"/{path}",
        "authority": "m3api.awenhao.com"
    }
    resp2 = requests.get(m3u8_url)
    with open("火星救援.m3u8", mode='wb') as f:
        f.write(resp2.content)
    print('m3u8下载完毕!')
    f.close()
    resp2.close()
|
-
拿到m3u8文件后才可以开始下载视频
图中红框示例部分就是视频资源的链接,可以从其中下载视频片段
- 下载视频片段
 1
 2
 3
 4
 5
 6
 7
 8
 9
10
11
12
13
14
15
|
# 拿到m3u8后,就可以开始下载视频了
num = 1
with open("火星救援.m3u8", mode='r', encoding='utf-8') as f:
    for line in f:
        line = line.strip()     # 去掉空格,空白,换行符
        if line.startswith('#'):    # 若行开头为 # , 不要
            continue
        # print(line)
        with open(f"video/{num}.mp4", mode='wb') as f:
            resp = requests.get(line)
            f.write(resp.content)
        f.close()
        resp.close()
        num += 1
        print(f"片段{num}下载完毕!!!")
|
- 最后需要软件将视频片段合成为完整的视频
4.7.2 复杂91
思路:
- 拿到主页面的页面源代码,找到iframe
- 从iframe的页面源代码中拿到m3u8文件
- 下载第一层m3u8文件 –> 下载第二层m3u8文件(视频存放路径)
- 下载视频
- 下载密钥,进行解密操作
- 将片段合成视频
暂未实施
异步下载视频:
 1
 2
 3
 4
 5
 6
 7
 8
 9
10
11
12
13
14
15
16
17
18
19
20
21
22
23
24
25
26
27
28
29
30
31
32
33
34
35
36
37
38
39
40
41
42
43
44
45
46
47
48
49
50
51
52
53
54
55
56
57
58
59
60
61
62
63
|
def get_m3u8(url):
    resp = requests.get(url)
    page_code = resp.text
    # print(resp.text)

    # 取m3u8的url
    obj = re.compile(r'"url":"(?P<m3u8_url>.*?)","', re.S)
    m3u8_url = obj.search(page_code).group('m3u8_url').replace('\\', '')
    # print(m3u8_url)
    m3u8 = requests.get(m3u8_url).content
    # print(m3u8)

    # 取title
    page_bs = BeautifulSoup(page_code, "html.parser")
    obj = re.compile(r'《(?P<title>.*?)》', re.S)
    title = obj.search(page_bs.find('title').text).group('title')
    # print(title.text)
    with open(f'{title}.m3u8', mode='wb') as f:
        f.write(m3u8)
    print(f'{title}.m3u8 下载完毕!')
    return f'{title}.m3u8'
#
#
# 拿到m3u8后,就可以开始下载视频了 异步
async def dowaload(url, name, session):
    async with session.get(url) as resp:
        async with aiofiles.open(f"video/{name}", mode='wb') as f:
            await f.write(await resp.content.read())        # 异步把下载的视频片段写入文件
    print(f'{name}下载完毕!')
#
#
async def aio_download(url):
    tasks = []
    m3u8= get_m3u8(url)
    # 在此处创建session比在download里面创建session好,因为只需要创建一次,若是在download中创建session,则每个人物都需要重新创建session
    async with aiohttp.ClientSession() as Session:
        # async with aiofiles.open(m3u8, mode='r', encoding='utf-8') as f:
        async with aiofiles.open(m3u8, mode='r', encoding='utf-8') as f:
            # 为了异步也可以按顺序排列视频片段,可以使用片段所在的行号进行命名
            # for num, line in enumerate(f, 1):
            async for line in f:
                line = line.strip()
                if line.startswith('#'):
                    continue
                else:
                    # print(line)
                    num = time.time()
                    # print(num)
                    name = f'{num}.mp4'
                    # print(name, line)
                    task = asyncio.create_task(dowaload(line, name, Session))
                    tasks.append(task)
            await asyncio.wait(tasks)       # 此处不能往前拉,只能写在for循环后
            print(f'{name}下载完毕!!!')


if __name__ == '__main__':
    url = 'https://91kju.com/vod-play-id-61412-sid-1-pid-1.html'
    # # get_m3u8(url)
    loop = asyncio.get_event_loop()
    loop.run_until_complete(aio_download(url))
    print('搞定!')
|
但其实这个方案无法按照片段顺序下载,所以可以得到行号以便进行排序,并且!!!行38和41根本不用异步吧???效果根本没有差别!!!可以用以下函数进行下载:
 1
 2
 3
 4
 5
 6
 7
 8
 9
10
11
12
13
14
15
16
17
18
19
20
|
async def aio_download(url):
    tasks = []
    m3u8= get_m3u8(url)
    # 在此处创建session比在download里面创建session好,因为只需要创建一次,若是在download中创建session,则每个人物都需要重新创建session
    async with aiohttp.ClientSession() as Session:
        # async with aiofiles.open(m3u8, mode='r', encoding='utf-8') as f:
        with open(m3u8, mode='r', encoding='utf-8') as f:
            # 为了异步也可以按顺序排列视频片段,可以使用片段所在的行号进行命名
            for num, line in enumerate(f, 1):
                line = line.strip()
                if line.startswith('#'):
                    continue
                else:
                    # print(num, line)
                    name = f'{num}.mp4'
                    # print(name, line)
                    task = asyncio.create_task(dowaload(line, name, Session))
                    tasks.append(task)
            await asyncio.wait(tasks)       # 此处不能往前拉,只能写在for循环后
            print(f'{name}下载完毕!!!')
|
五、selenium
5.1 概述
问题:
能不能让我的程序连接到浏览器,让浏览器里来完成各种复杂的操作,我们只需要接受最后的结果
selenium:
自动化测试工具,可以打开浏览器,然后像人一样去操作浏览器,我们可以从selenium中直接提取网页上的各种信息
环境搭建:
conda install selenium
下载浏览器驱动:https://chromedriver.storage.googleapis.com/index.html
把解压缩的浏览器驱动 chromedriver 放在python解释器所在的文件夹
让selenium启动谷歌浏览器!!!
查找浏览器的版本号:
去给的网站里找对应的版本号:
把解压缩的浏览器驱动 chromedriver 放在python解释器所在的文件夹,python解释器的路径如下:
粘贴进去:
让selenium启动浏览器:
1
2
3
4
5
6
|
from selenium.webdriver import Chrome

# 1. 创建浏览器对象
web = Chrome()
# 2. 打开一个网址
web.get("https://www.baidu.com")
|
案例,抓取拉勾网信息:
要注意的是!!!一定要加等待时间,否则有可能发生 未加载完就点击(或者拉取信息)导致失败(或信息不全)!!!
1
2
3
4
5
6
7
|
web.implicitly_wait(30)  # (智能)隐式等待,5秒内加载完就直接执行下一条指令,若超过5秒,报错

# WebDriverWait(你的chrome()对象, maxWaitTime(s), checkInterval(s))
# 后面的 .until的意思是 直到括号内的lambda表达式成立,例如此处lambda的意思就是:加载出name为'DZ_JSDTCJTW'的element。
# 整行完整意思就是:每过0.2s就检查一下是否加载出名为'DZ_JSDTCJTW'的元素,若加载出,就执行下一行,若还无,最长等待10s。
WebDriverWait(driver, 10, 0.2).until(lambda x: x.find_element_by_name('DZ_JSDTCJTW'))
driver.find_element_by_name('DZ_JSDTCJTW').send_keys(self.random_temp())
|
 1
 2
 3
 4
 5
 6
 7
 8
 9
10
11
12
13
14
15
16
17
18
19
20
21
22
23
24
25
26
27
28
29
30
31
|
import time

from selenium.webdriver import Chrome
from selenium.webdriver.common.keys import Keys


web = Chrome()

web.get("https://lagou.com")

# 找到某个元素,点击它
el = web.find_element_by_xpath('//*[@id="changeCityBox"]/p[1]/a')
el.click()   # 点击事件

web.implicitly_wait(30)  # (智能)隐式等待,5秒内加载完就直接执行下一条指令,若超过5秒,报错
# 在搜索框中 搜索python

el = web.find_element_by_xpath('//*[@id="search_input"]').send_keys("python", Keys.ENTER)   # 找到输入框  输入python并回车

web.implicitly_wait(30)     # 防止未加载完,导致输出不全   *****很重要!!!

# 找到信息所在位置  elements 是找到所有的
job_list = web.find_elements_by_xpath('//*[@id="jobList"]/div[1]/div')

for item in job_list:
    # job_name = item.find_element_by_tag_name("a").text    # 查找 item中 a标签的值
    # print(job_name)
    job_name = item.find_element_by_xpath('./div/div/div/a').text
    job_price = item.find_element_by_xpath('./div/div/div[2]/span').text      # ./ 相对路径
    job_company = item.find_element_by_xpath('./div/div[2]/div/a').text
    print(job_name, job_price, job_company)
|
获取标签内元素的值:
1
2
|
detail1 = web.find_element_by_xpath('//*[@id="zpid_19506994"]/div[2]/a')
print(detail1.get_attribute('href'), detail1.get_attribute('class'))
|
5.2 窗口切换
如何进入到新窗口中进行提取
注意:在selenium眼中,新窗口默认是不切换过来的
1
|
web.switch_to.window(web.window_handles[-1]) # -1代表最后一个窗口(从右往左) 也可以切换到其他窗口!
|
5.3 无头浏览器
1
2
3
4
5
6
7
|
from selenium.webdriver.chrome.options import Options

opt = Options()
opt.add_argument("--headless")
opt.add_argument("--disable-gpu")

web = Chrome(options=opt)
|
5.4 验证码识别
**超级鹰!**或 ddddocr
哪里用就往哪里搬!
 1
 2
 3
 4
 5
 6
 7
 8
 9
10
11
12
13
14
15
16
|
1. chaojiying
# 用户中心>>软件ID 生成一个替换 96001
chaojiying = Chaojiying_Client('15237174980', '12345678', '930009')
# 本地图片文件路径 来替换 a.jpg 有时WIN系统须要//
im = open('a.jpg', 'rb').read()     # im就是图片的所有字节
# 1902 验证码类型  官方网站>>价格体系 3.4+版 print 后要加()
print(chaojiying.PostPic(im, 1902))

2. ddddocr	pip install ddddocr
def identifyCode(imgPath) -> str:
    ocr = ddddocr.DdddOcr()
    img = open(imgPath, 'rb').read()
    return ocr.classification(img)
# 上述是读取图片路径的方式,结合selenium也可以
img = web.find_element_by_xpath('图片的xpath').screenshot_as_png
ocr.classification(img)
|
5.5 防止自动化被屏蔽
这样有时会被屏蔽掉!!!
解决方法!其实和无头浏览器很相似!!!
Chrome版本号大于88时:
1
2
3
4
5
6
|
from selenium.webdriver.chrome.options import Options

opt = Options()
opt.add_argument('--disable-blink-features=AutomationControlled')

web = Chrome(option=opt)
|
六、Js逆向
本地运行JS,得到和浏览器一样的加密数据,发送给服务器
6.1 断点
网站代码运行的时间轴:
加载html->加载js->运行js初始化->用户触发某个事件->调用了某段js->加密函数->给服务器发送信息(XHR->SEND)-> 接受到服务器的数据-> 解密函数->刷新网页渲染
分类:
DOM断点:当渲染的时候(样子发生改变的时候),才有用;在加密过程中,其实是比较靠前的执行步骤,距离加密函数比较远,无法根据栈去快速定位,不太推荐用DOM断点
DOM事件断点:和DOM类似,如果不能用DOM下断,则考虑用DOM事件
XHR断点:执行的比较靠后,距离加密函数比较近,可以根据栈快速定位,非XHR发送的就无法断住
代码行断点
代码的断点 debugger
全局事件断点(浏览器事件断点)
异常捕获断点
七、Scrapy框架
框架就是集成了很多功能并且具有很强通用性的一个项目模板,学习框架封装的各种功能的详细用法。
Scrapy是爬虫中封装好的一个明星框架,功能:高性能的持久化存储,异步数据下载,高性能的数据解析,分布式
基本使用:
- 安装环境:
1
2
3
4
5
|
conda install wheel
下载twisted,下载地址为:http://www.lfd.uci.edu/~gohlke/pythonlibs/#twisted
安装twisted:conda install Twisted-...
conda install pywin32
conda install scrapy
|
python生成exe文件
1
2
3
4
5
|
Pyinstaller -F setup.py 打包exe

Pyinstaller -F -w setup.py 不带控制台的打包

Pyinstaller -F -i xx.ico setup.py 打包指定exe图标打包
|
git bash 使用conda切换环境
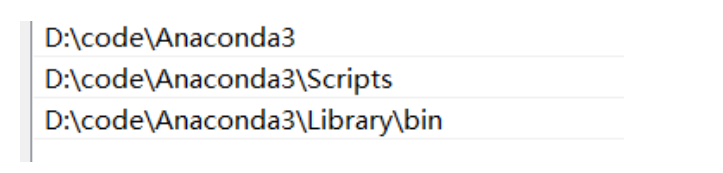
-
将anaconda的图示的几个路径添加进去
 1
 2
 3
 4
 5
 6
 7
 8
 9
10
11
12
13
14
15
16
17
18
19
20
|
创建环境
conda create -n your_env_name python=3.7

删除环境
conda remove -n your_env_name --all

激活自定义的环境
source activate your_env_name

退出环境
source deactivate
conda deactivate//或者这样

列出所有的环境
conda env list
conda info --envs//或者这样

conda安装包和卸载包
conda install x //安装x包
conda uninstall x //卸载x包
|


